FaceFX Support
FaceFX Documentation and support
Curve Editor

Controls
- Select - To see a curve and its associated keys, you have to make sure the curve is selected in the Curve Select Widget. Click on a key, or use the left mouse button to drag out a selection of multiple keys.
- Move - Click on a selection and drag the left mouse button to move the keys. If you hold down the Shift key when keys are selected you do not need to click on the keys prior to moving them. If you use both the middle mouse button and the left mouse button to move a key, you will constrain the movement to the horizontal or vertical axis.
- Insert Key - Press the insert key then left-click in the curve view to add keys to all of the selected curves.
Buttons (Left to right)
- Cut, Copy, Paste - You can cut, copy, and paste keys from one curve to another using the right-click menu, the keyboard shortcuts Ctrl+X, Ctrl+C, and Ctrl+V, or the X, C, and V buttons at the top of the Animation Tab. The keys will be pasted starting at the currently selected time.
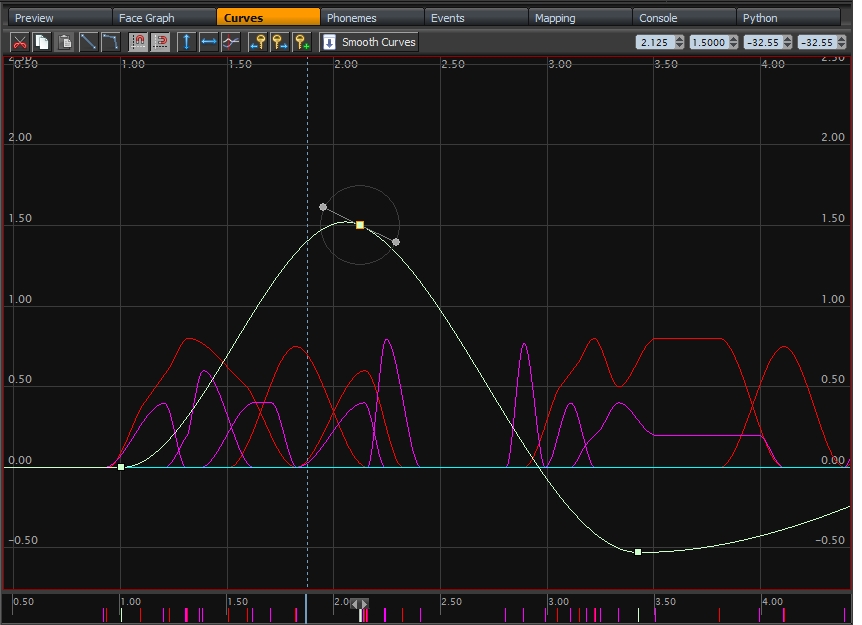
- Lock/Unlock Tangents - Select a key to display the key’s tangents. Click on the blue manipulator to modify the tangent. You can lock or unlock tangents with the LT and UT (Lock Tangents, Unlock Tangents) buttons.
- Snap to Horizontal/Vertical grid - You can turn on and off snapping to the horizontal and vertical grid lines with the SV and ST (Snap Value, Snap Time) buttons.
- Fit Value/Time - Use these buttons to fit the selected curves to the value or time axis. The FV button fits the curves to the value axis, while FT fits the curve to the time axis.
- Display All Active - Displays all curves with non-zero values at the current time.
- Previous Key / Next Key - Sets the current time to the next/previous key in the timeline. Only selected curves are included.
- Add Key - Inserts a key at the current time for all selected curves. The value and tangents will match the existing curve.
- Curve Smoothing - Brings up the curve smoothing dialog to smooth curves.
Virtual and Offset Curves
The FaceFX Studio Curve Editor is unlike most curve editors because the animation curves are not solely responsible for driving the nodes. Nodes can also have inputs from other nodes which are added to the animation curve values, or from events in the animation’s take. As a result, the keys in a node’s curve do not determine the final value of the node. Instead, the keys create an offset curve which is added to the value calculated from the node inputs, then subjugated to the node’s min and max values. The resulting curve is called the virtual curve. Virtual curves are represented by dotted lines in the curve editor and they can be seen only when a node has inputs from other nodes, or the offset curve goes outside of the node min/max values.
When a node does not have any inputs, you can not see the dotted virtual curve, only the solid line connecting the keys. When a dotted line exists, it represents how the node will actually be evaluated over time.
Owned By Analysis
- Curves that are generated during the analysis process are initially marked as “Owned by Analysis”.
- Keys are not visible for curves that are owned by analysis because they are regenerated automatically by other operations (like doing an analysis take or modifying the phoneme bar).
- To gain full control of owned by analysis curves, select the curves and uncheck the owned by analysis checkbox in the curve select widget. Changes you make to the keys directly will be lost if you set the curve as owned by analysis and perform an operation that regenerates the curve.
Copying and Pasting Keys
From the curve editor, you can copy and paste keys from one curve or animation to another. You can also paste keys to a different time in the same animation. Pasting keys between different instances of FaceFX Studio is supported.
Copy & Paste keys has two modes: single select and multi-select.
- Single Select - when you copy keys (Ctrl + C) from a single source curve, then select a single destination curve and paste (Ctrl + V) you are in single select mode. You can move keys from one curve to another using single select mode. You can also copy keys to a different time in the same curve.
- Multi Select - If you copy keys from multiple curves, or if multiple curves are selected when you paste, then you are in multi-select mode. In this mode, the curve names are respected. Keys are inserted into curves that have the same name as the source curve. New curves will be inserted into the animation if required. You can copy keys from one animation to another, or copy keys to different times in the same animation using multi-select mode.
Curve Editor Keyboard Shortcuts
| LMB Click | Select | | LMB Drag | Marquee Select or Move | | MMB Drag | Pan Time | | MMB Scroll | Zoom Time | | Shift + MMB Scroll | Zoom Value | | Shift + LMB Drag | No-Hit-Test Move Selected | | Ctrl + LMB Drag | Toggle Select | | Ctrl + MMB Drag | Change time | | Ins + LMB Click | Add key | | Ctrl + Shift + LMB Drag | Horizontal/Vertical move key | | Ctrl + Shift +MMB Drag Ctrl + A | Zoom to selection Select all | | Ctrl + R Delete Insert Ctrl + D | Auto Resize Delete selected keys Insert key on all visible curves Reset tangents to zero |